Instagram Cinematic Flash Filter AI Photo Editing Prompt – Nowadays, photos are frequently posted on platforms like Instagram and YouTube. You have likely come across such “cinematic” photos. This trend of cinematic photography is gaining immense popularity and is being appreciated by a large audience. The process involves taking a standard photograph and transforming it by applying a cinematic color grade. Now, is this type of cinematic editing reserved solely for professionals? Absolutely not. Even if you are a complete beginner, you can certainly perform this kind of editing. We will create these edits using Google Gemini, as many people are still unaware of its capabilities in this regard. I will guide you through the creation process step-by-step, enabling you to effortlessly produce professional-quality photos.
Why Are People Loving These Type Editing
So, why are people loving these specific photos so much right now? The truth is, these images are actually created using a specific Instagram filter. Let me explain exactly how it’s done. If you wish to do this directly through Instagram, you certainly can. First, open the Instagram app. Navigate to the ‘Stories’ section and select any photo of your choice. Next, look at the top right-hand corner of the screen; you will find an option labeled ‘Restyle.’ Click on it to access various editing tools and make any changes you desire to your photo. At the bottom of the screen, you will see a selection of new filters. Among them, you will find a filter named ‘Flash.’ As soon as you select it, it will take just a few seconds to apply to your image. Once applied, your photo will be effortlessly transformed into a cinematic-style image.
How to Select A Perfect photo?
Look—do you know what the biggest mistake people make here is? Whenever you are selecting a photo for this type of editing, you should always upload your complete, final image. This is because the tool won’t alter the background colors or change the background itself; it will simply add a color grade to your photo. For instance, if you want to give your image a cinematic look, these prompts will work perfectly. They allow you to take a photo you’ve already prepared and—in a completely professional manner—easily apply specific color grades to it. These color schemes will complement your photos beautifully, as they are currently a major trend on social media.
How To Create Image With Instagram Cinematic Flash Filter AI Photo Editing Prompt
Here is how to edit photos using Google Gemini: First, open Google Gemini. Upload the specific photo you wish to color grade. Next, paste a prompt into the input field; several prompts are already provided within the accompanying article—simply copy any one of them. You will then see a “Generate” button; click it to initiate the process, wait just a few seconds, and you will receive excellent results for your photo. Please keep in mind that you may not get a perfect result on your very first attempt. It is always advisable to try two or three different variations; you are bound to find one that you like, as the tool generates a unique style—incorporating different changes and elements—each time you run the generation process.
Apply a strong direct flash effect with high exposure and harsh lighting.
Increase contrast and sharpness significantly.
Add cool cyan/blue tones to shadows while keeping highlights slightly blown out.
Skin tones should appear bright and slightly washed with a glossy flash look.
Boost whites and reduce midtones for a punchy, high-fashion aesthetic.
Add subtle noise and grain for a raw camera flash feel.
Background should look darker and metallic with reflections enhanced.
Overall look: paparazzi flash, night photography, bold, dramatic, Instagram restyle "flash" filter style.

Apply a strong direct flash effect with controlled exposure.
Increase contrast deeply with rich blacks and slightly crushed shadows.
Add cinematic teal tones in shadows and warm orange tones in highlights (teal & orange look).
Reduce overall brightness slightly while boosting color depth and saturation.
Skin tones should remain warm, natural, and slightly glossy.
Enhance texture and sharpness while keeping a soft highlight glow.
Add subtle vignette and light grain for a cinematic feel.
Background should appear darker, moody, and slightly desaturated with metallic reflections.
Overall look: deep cinematic flash photography, dramatic, rich colors, Instagram restyle flash + cinematic blend.
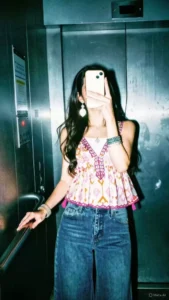
A high-contrast mirror selfie of a woman with long dark wavy hair. She is wearing a dusty blue off-the-shoulder long-sleeve crop top and high-waisted black trousers. She is holding a smartphone with a decorative case in front of her face, obscuring it. She stands against a vibrant red brick wall under a harsh overhead light that creates deep shadows and a cinematic film-noir vibe. The photo has a slightly grainy, 35mm film aesthetic with visible flash-glare and a cool-toned, moody atmosphere
How to Make Your Video Go Viral?
First and foremost, if you want to make your video go viral, you will need to adopt the “Before and After” strategy. This involves first presenting a standard, ordinary photograph, followed by a cinematic one. In the standard photo, you will see entirely normal elements—much like a casual snapshot taken straight from a camera—whereas the cinematic photo will feature strong contrast, high visual engagement, and a rich palette of cinematic colors. By creating a video or even simply posting a “Before and After” image set that showcases this transformation, you significantly increase your chances of going viral, as audiences naturally love to view “Before and After” content.
Conclusion
I hope you enjoyed this Instagram trending filter, as many people haven’t found it to be a stylish option. So, I thought I’d teach you my method, which you’ll love, and you’re 100% sure you’ll love it. What if you give it a try?