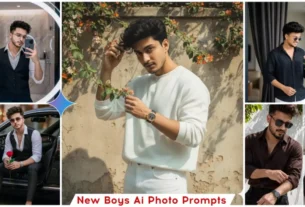
Shin Chan Style Ai Photo Editing – On Instagram, you often see photos that go viral, and let me tell you, creating trending edits like those is very easy these days. In fact, it’s become incredibly simple. You’ll see that for this type of editing, you just need to use prompts, and your edit will be perfect. In this article, I’m going to tell you how easily you can do this kind of editing and how to create and make it go viral. I’ll explain the editing process in a very simple way. We can even use Gemini for this, or we can do it with the help of ChatGPT. There are different ways to create these edits; you can choose whichever method you prefer.
Details Of Shin Chan Style Ai Photo Editing
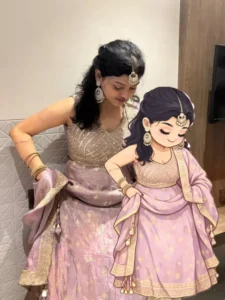
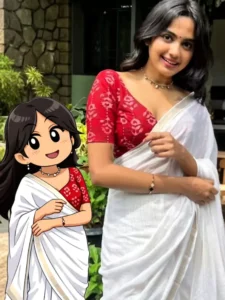
Okay, so let’s talk about the editing we’re discussing. How does it look? Here you’ll see a character, the Shinchan character. What is this Shinchan character? It’s like seeing your own photo as a cartoon character. For example, you use a photo of yourself, and in the photo, your character will be converted into a cartoon and appear next to your original photo. This is what people are calling the “Shinchan photo,” and it’s becoming very popular. I saw one photo with millions of likes, so I thought, why not share this editing technique with you? I’ll also tell you the simple way to create it. To create it, you just need to use a prompt. Your photo will be created. I’ll also show you how to use a reference photo. And if you face any difficulties in creating it, you can ask us for help.
1000+ Google Gemini Photo Prompts
Editing Process
Look, there’s something you need to understand here. After generating the photos, you’ll have to apply them to your own photo. I can explain this to you using two methods. Let me explain it to you verbally. First, we need to generate the photo. After generating it, you’ll have to add the cartoon character to it. The other process is that it will be generated directly and appear on your photo. Now, both points have been shared with you. You have to choose which one to use. I’ll explain both processes. First, I’ll explain the photo generation process. Then, in the next step, I’ll explain how to apply the generated cartoon photo to your own photo.
Create a miniature 2D cartoon illustration based on my uploaded photo. Keep the style flat, cute, and slightly chibi inspired with clean outlines and soft pastel colors. Preserve my facial features, hairstyle, and expression accurately, but simplify them in a playful, cartoonish way. Use smooth shading, minimal details, and a neat, aesthetic look. The character should feel lightweight, adorable, and modern, like a sticker or tiny avatar. No realism, no 3D, strictly 2D cartoon style.
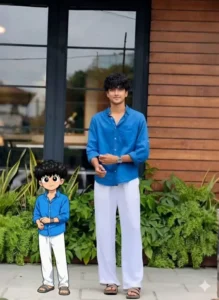
Transform the subject from the uploaded photo into the Crayon Shin-chan (Shinnosuke Nohara) anime style, referencing Shin-chan’s full cast of friends (such as Kazama, Nene, Masao, and Bo-chan).Style & Aesthetic: Match the official Crayon Shin-chan TV anime look — exaggerated cartoon humor, stubby childlike proportions, big oval eyes with dot pupils, expressive mouths, bold clean outlines, and flat cel coloring.Subject Details to Retain: Keep the subject’s original clothing, hairstyle, accessories, pose, skin tone, and expression recognizable, but reinterpret them as if they are part of Shin-chan’s friend group. Clothing should be simplified into bold, flat anime shapes while remaining faithful to the original outfit.Visuals: Full-body character in Shin-chan anime style. Bold outlines, flat cel fills, minimal shading. Comedic proportions and facial expressions referencing Shin-chan’s friends.Background: White or transparent background.Negative Prompt: No realistic faces, no detailed or 3D shading, no manga sketch lines, no extra accessories, no anime style outside of official Crayon Shin-chan.
Transform the subject from the uploaded photo into the Crayon Shin-chan (Shinnosuke Nohara) anime style, referencing Shin-chan's full cast of friends (such as Kazama, Nene, Masao, and Bo-chan).

Style & Aesthetic:

Match the official Crayon

Shin-chan TV anime look -exaggerated cartoon humor, stubby childlike proportions, big oval eyes with dot pupils, expressive mouths, bold clean outlines, and flat cel coloring.

Subject Details to Retain:

Keep the subject's original clothing, hairstyle, accessories, pose, skin tone, and expression recognizable, but reinterpret them as if they are part of Shin-chan's friend group.

Clothing should be simplified into bold, flat anime shapes while remaining faithful to the original outfit.

Visuals:

Full-body character in Shin-chan anime style.

Bold outlines, flat cel fills, minimal shading.

Comedic proportions and facial expressions referencing Shin-chan's friends.

Background:

White or transparent background.

Negative Prompt:

No realistic faces, no de
How To Create Image With Shin Chan Style Ai Photo Editing
Now, creating the photo is a very simple process. You’ll find different types of prompts in various styles shared here. Copy the one you like best. After copying, you’ll see a “Generate” button below. Click on “Create Image.” After clicking, you’ll be redirected to the Google Gemini website. There, you’ll need to paste the prompt first. Paste your chosen prompt there. Then, go to the plus (+) option and upload the photo you want to add the cartoon character to. Once you upload the photo, click “Generate.” You might get two photos. As I mentioned, there are two different styles of prompts. I can’t explain them all here, but when you generate the image, if the cartoon character is added to your photo, then your work is done. However, instead of adding a cartoon character, it might convert your photo into a cartoon. Save that image. In the next step, I’ll explain how to apply it to your photo.
How To Convert Image Into Sticker
Now, you can convert this into a sticker first. You have another option. If you have an iPhone, you can copy it directly, but if you don’t have an iPhone, I’ll explain the process for Android. What you need to do is go to WhatsApp, and when you send a message to someone, there’s a sticker option. You can also add custom stickers there. So, go to the custom sticker section, and as soon as you select this photo, it will add a cute effect and prepare it for you. What you need to do is send your photo to someone. Select the photo, then go to the sticker section, select the sticker, and this photo will appear on the sticker. You can adjust it there. Then send it. After sending, you can save that photo to your gallery by clicking on the three dots. If you want to upload it to any platform, you can create all the photos this way and upload them.