Google Gemini Old Photo Restoration Ai Photo Editing Prompts – How are you all? Welcome to our website. You all know that creating trending photos and videos on Instagram is a great thing for you. But let me tell you. Nowadays, you can create photos. But in the old days, there might be a photo of your grandfather or even your father. If you look at it, you’ll be even more surprised because that photo gets damaged over time. The photo that is extracted, that is, it is extracted on a piece of paper. After some time, it gets damaged. You’ll notice that you can’t re-image it because it’s already damaged. Nowadays, you get the RAW file, which you can re-image, extract, but at that time, there was no such option. So, let me tell you that if you have an old photo and you want to fix it according to the current times, I’ll tell you about a tool that can help you fix any of your old photos. To understand it in detail, you will have to read this article carefully, in which I will explain it completely.
1000+ Gemini Trenidng Image Prompts
Details Of Google Gemini Old Photo Restoration Ai Photo Editing Prompts
Look, as I explained in this article, you can restore any old photo of your home. Restoring means you can bring it back to its original state and give it a completely new look. If you’re not sure about this photo, take a look at this thumbnail. I’ve shown an old photo and how it looks after restoration. You’ll see the same thing. If you have a photo, you can use it to restore your photo here. All you need is a prompt, which I’ve provided in this article. Now, using that, you can create this photo. Let me explain how you upload the photo there and how you generate it.
How To Click Old Photo In Your Phone
Look, if you want to use that photo, you’ll first need a photo, because you have to click it from your room. I’ll explain how to do it. If you have the photo on your phone, only then upload it to Gemini. Then, when you want to generate it, I’ll explain the process. First, you need to place the photo on a plain background. Then, take it closer to your room, turn off the flash, and click it. Your photo should look a little normal there. But you should understand how the face looks if half of it is erased. Even if the half is there, it should be clearly visible. If you click the photo with the flash, what happens is that light falls on it, and it doesn’t look right on the photo. I’ll explain how you click it this way. Then I’ll explain the process. If you generate it, you’ll get a very good result.
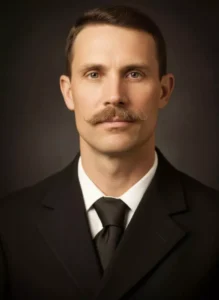
Ultra-clean and hyper-detailed restoration and colorization of an old historical photograph, preserving the original framing, composition, and proportions. Remove blur, scratches, stains, discoloration, and digital artifacts while keeping the authentic archival character of the photo. Enhance natural textures such as facial details, wrinkles, hair strands, clothing fabric, and background surfaces with photoreal clarity. Keep the faces same as the provided image."
How To use Google Gemini Old Photo Restoration Ai Photo Editing Prompts
First, understand how to generate this photo, because this is the process that will create your photo. You’ll be presented with a prompt. You need to copy it. A button has been added for copying it. Clicking on it will copy it. Then, go to Google Gemini, where you’ll first need to paste the prompt. A button is provided for this. You can go there directly by clicking on it. Once there, paste the prompt and then click on the plus option to upload the photo you just clicked from the camera. After selecting it, click on the option. You’ll see your photo restored and ready in a few seconds. It will return to its original state. This is how you can generate it. You can restore your photo.
How To Bring Best Result In These Photos
If you want the best result of your photo then you can add these few steps also. If you upload more photo there and then use prompt. You have to add all these sentences in it. Like you can try it one by one. First of all you have to write high resolution in it, what happens with this is that your photo gets ready with all the good details. After that add natural look text in it. Then after that write clarity plus, damage fix and then colourization, what happens with this is that your photo will be ready in HD, all the damages that were already done in it, all those things will get fixed and your photo will be ready with perfect colour which will match the background.